
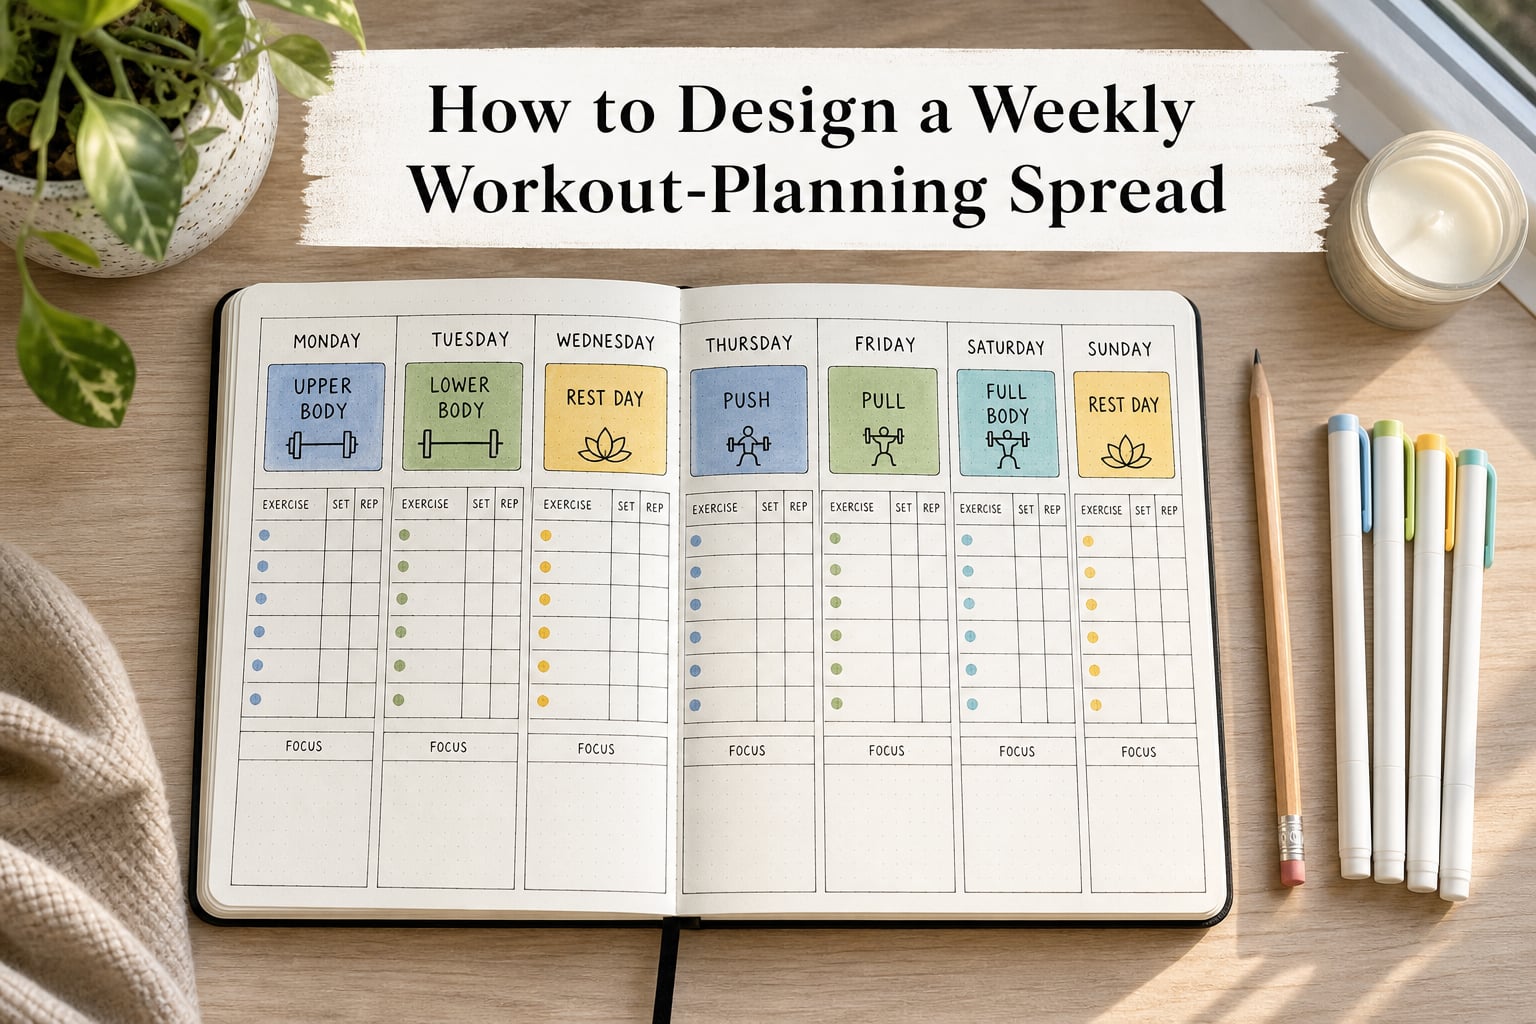
I have watched too many people walk into the gym with nothing but a vague idea and walk out three months later wondering why nothing changed. The missing piece is almost always the same: a planning spread they actually designed for their life.
A pre-printed tracker from an app or a generic PDF template can work in a pinch. But when you learn how to design a weekly workout planning spread from scratch, you build a system that matches your schedule, equipment, and goals instead of forcing yourself into someone else’s format.
In this guide, I will walk you through exactly how to design a weekly workout planning spread. You will get the key elements every spread needs, a step-by-step build process, three sample layouts for different goals, and answers to the questions I hear most often from readers.
Table of Contents
- What Is a Weekly Workout-Planning Spread
- Why Designing Your Own Workout Layout Beats Pre-Made Templates
- Key Elements of an Effective Workout Planning Spread
- Step-by-Step Guide to Designing Your Workout Spread
- Sample Weekly Workout Planning Layouts
- Digital vs Paper Planning: Which Spread Format Works Best
- Common Mistakes to Avoid in Your Spread Design
- How to Track Progress in Your Workout Spread
- Frequently Asked Questions
- Conclusion
What Is a Weekly Workout-Planning Spread
A weekly workout-planning spread is a single-page or two-page layout that maps out your training across seven days. Think of it as the dashboard for your fitness week.
At its core, the spread shows what you plan to do each day, how hard you plan to push, and where you will track what actually happened. The format can live in a paper planner, a bullet journal, a printable sheet, or a digital tool like Notion or Google Sheets.
The word “spread” comes from the bullet journal community. A spread is simply the layout you create when you open to a fresh two-page section of your notebook. The term stuck because it describes the layout well: information spread across the page in a way that is easy to read at a glance.
A solid weekly workout planning template typically includes four sections: a daily workout block, a tracking column for sets and reps, a space for notes on how the session felt, and a weekly summary area for totals and progress markers. Skip any of those four and the spread loses much of its value.
Why Designing Your Own Workout Layout Beats Pre-Made Templates
Pre-made templates look convenient, but they were built for an average user who does not exist. Your training age, your equipment, your recovery needs, and your schedule are all different.
When you design your own workout schedule design, you control the level of detail. Beginners often want more guidance on each page because they are still learning exercise names and form cues. Advanced lifters usually want a minimalist layout focused on progressive overload numbers.
I built my first spread after six months of bouncing between apps, notebooks, and screenshots on my phone. Within two weeks of using my own layout, my consistency jumped because I stopped fighting the format. That is the real benefit of designing your own workout planning template.
You also future-proof your planning. A custom spread can include space for habits you are tracking alongside workouts, like sleep, water intake, or mobility work. Off-the-shelf templates rarely leave room for the way you actually live.
Key Elements of an Effective Workout Planning Spread
Before you put pen to paper, you need to know what belongs on the page. These are the elements I include on every spread I design, whether for myself or for a client.
The Day Block
Each day needs a clearly labeled block, ideally one column per day running down the page. Inside each block, leave room for the workout type (push, pull, legs, cardio, rest) and the time you plan to train.
Exercise and Set Tracking
You need three lines per exercise minimum: the movement name, the working sets, and the weight or resistance used. If you want to track reps per set, give yourself five lines.
Rest Day Visibility
Rest days must be visible on the spread, not hidden. I draw a soft grey block or a “REST” stamp across those days so I cannot talk myself out of recovery.
Progress Markers
Leave a column or footer for weekly progress notes: weight lifted, body weight, energy level, or any PR hit. Without this, the spread tracks sessions but not growth.
Quick-Reference Rules
Two rules deserve a permanent home in your spread. The first is the 3-3-3 rule: aim for 30 minutes of cardio, 30 minutes of strength training, and 30 minutes of stretching three days a week. The second is the 5-5-5-30 rule: 5 minutes of warm-up, 5 minutes of dynamic stretching, a 30-minute main workout, and 5 minutes of cool-down. Pin these next to your weekly layout so the principles stay visible.
Step-by-Step Guide to Designing Your Workout Spread
Here is the exact process I use when designing a new weekly workout planner layout. Work through these steps in order, and you will end up with a spread you actually want to use.
Step 1: Define Your Primary Goal
Write one sentence at the top of the spread describing what this training week is for. Examples: “Build upper body strength,” “Lose 4 pounds in 4 weeks,” or “Train for a 10K.” The goal dictates everything else.
Step 2: Pick Your Training Split
Choose how you want to distribute muscle groups across the week. The most common options are full-body three days, upper/lower four days, push/pull/legs six days, or a bro split. Match the split to your recovery capacity, not your ambition.
Step 3: Block Out the Seven Days
Draw seven columns or rows. Mark training days with the muscle group or workout type. Mark rest days with a clear visual cue. Leave one “flex” day open for missed sessions.
Step 4: Add Exercises to Each Day
List 4 to 6 exercises per training day. Include at least one compound movement (squat, deadlift, bench, row, overhead press) and one accessory that targets a weak point. Keep the list short enough that you can finish the workout in 45 to 60 minutes.
Step 5: Pre-Fill Sets, Reps, and Rest
For each exercise, write the target set count, rep range, and rest period before you ever step into the gym. This is the difference between a workout log and a workout plan.
Step 6: Add a Tracking Section
Below or beside the workout blocks, add columns for actual weight lifted, actual reps completed, and how the session felt on a 1 to 5 scale. The spread should record what happened, not just what you planned.
Step 7: Reserve Space for Weekly Reflection
At the bottom of the page, draw a box for end-of-week notes. What went well, what hurt, what to change next week. Without this step, you will repeat the same mistakes every cycle.
Step 8: Test, Adjust, and Repeat
Use the spread for one full week. Notice what you reached for, what you ignored, and what felt cramped. Redesign the layout for week two. Most people settle into a final format after three cycles.
Sample Weekly Workout Planning Layouts
Three layouts cover the majority of readers who write in. Pick the one closest to your goal and customize from there.
Layout 1: Beginner Full-Body (3 Days)
This layout works for someone just starting out who can train three non-consecutive days per week. Monday, Wednesday, and Friday hold full-body sessions, with the remaining days marked as rest or active recovery.
Each training day includes squats, a hinge pattern like a deadlift or Romanian deadlift, a push (push-up or bench press), a row, and a core movement. Sets stay in the 3×10 to 3×12 range with 60 to 90 seconds of rest.
Layout 2: Intermediate Upper/Lower (4 Days)
Monday and Thursday hold upper-body sessions. Tuesday and Friday hold lower-body sessions. Wednesday, Saturday, and Sunday are spread across rest, cardio, and mobility.
Upper days alternate between horizontal pressing (bench) and vertical pressing (overhead). Lower days alternate between squat-dominant and hip-hinge-dominant sessions. This pattern, called a weekly gym schedule planner upper/lower split, is the most researched split for building muscle and strength at the same time.
Layout 3: Advanced Push/Pull/Legs (6 Days)
Six training days cycle through push, pull, and legs on rotation, with one full rest day built in. This is a high-volume layout and only works if you can recover properly between sessions.
Each day includes 5 to 7 movements with more isolation work than the beginner layout. Tracking becomes critical here because progressive overload is the only way to keep making progress at this volume.
Digital vs Paper Planning: Which Spread Format Works Best
I hear this question at least once a week, and the honest answer is that both work. The best format is the one you will actually open on training day.
Paper spreads shine when you want a tactile, distraction-free experience. Drawing the layout is itself a planning ritual, and you cannot fall down a social media rabbit hole mid-spread. Bullet journal fitness spreads also let you customize aesthetics in ways digital tools cannot match.
Digital spreads win on accessibility and analysis. A Google Sheet or Notion database lets you pull up your plan on your phone at the gym, sort past weeks by volume, and graph progress over time. Forum threads on Reddit consistently show users gravitating toward digital formats for this exact reason.
Hybrid planning is the underrated option. Use a paper spread for daily training and a digital sheet for long-term tracking. Many serious lifters keep both: a bullet journal fitness spread on the desk and a spreadsheet on the phone.
Common Mistakes to Avoid in Your Spread Design
I have made every one of these mistakes at some point. Save yourself the trouble and design around them from the start.
The first mistake is cramming too much on one page. If you cannot read the spread from arm’s length, it is too dense. White space is a feature, not waste.
The second is skipping the tracking column. A spread without actual numbers is a wish list, not a plan. Always leave room to record what really happened.
The third is designing for an ideal week, not a real week. If your Tuesday is reliably slammed with meetings, do not schedule leg day on Tuesday. Build the spread around your actual calendar.
The fourth is forgetting mobility and warm-up. If your spread jumps straight into heavy work, you will get injured. Add a small box at the top of each training day for warm-up and one at the bottom for cool-down.
The fifth is redesigning every week. Give each layout at least three weeks before changing anything. You cannot tell whether a format works from a single sample.
How to Track Progress in Your Workout Spread
The spread is only as useful as the data you put into it. Tracking turns a layout into a feedback loop.
Track the same handful of metrics every week so you can compare apples to apples. The four I recommend: total working sets per muscle group, average weight on your main compound lifts, body weight once a week, and a subjective energy score from 1 to 5.
Review the spread every Sunday. Look for patterns. Did energy drop on days you slept under seven hours? Did bench press stall after week three? The notes section of your spread is where training gets smarter over time.
If you want a long-term view, transfer the weekly summary into a separate progress log at the end of every month. The spread captures the week; the log captures the trend.
Frequently Asked Questions
What is the 3-3-3 rule for workouts?
The 3-3-3 rule is a simple weekly target: aim for 30 minutes of cardio, 30 minutes of strength training, and 30 minutes of stretching on three days each week. It is useful as a baseline for beginners building a weekly workout planning spread because it keeps the three core pillars of fitness visible on the page.
How do I structure a weekly workout plan?
Start by defining one primary goal for the week. Pick a training split that matches your recovery capacity, such as full-body, upper/lower, or push/pull/legs. Block out seven days with training and rest clearly labeled. Add 4 to 6 exercises per training day, pre-fill sets and reps, and reserve a tracking column to record what actually happens.
How should I spread out my workouts throughout the week?
Spread training days so the same muscle group is never hit on back-to-back days. For a three-day plan, train Monday, Wednesday, and Friday. For a four-day plan, train Monday, Tuesday, Thursday, and Friday with Wednesday as a rest or active recovery day. Match the spacing to your schedule, not an arbitrary template.
What is the 5 5 5 30 rule?
The 5 5 5 30 rule is a single-session structure: 5 minutes of warm-up, 5 minutes of dynamic stretching, a 30-minute main workout, and 5 minutes of cool-down. Pin it to your weekly workout planning spread so every session follows the same proven frame.
How do I design a workout planning spread in a bullet journal?
Open to a fresh two-page spread and divide the page into seven columns, one per day. Leave the top quarter for weekly goals and the bottom strip for notes. Use mildliners or brush pens to color-code training days versus rest days. Inside each day block, list the workout type, exercises, and target sets and reps.
Conclusion
Knowing how to design a weekly workout planning spread is less about artistic skill and more about decision-making. You are deciding what to track, when to train, and how to measure progress. The layout is just the container.
Start with the eight-step process in this guide, use one of the three sample layouts as a starting point, and adjust after every week. Within a month, you will have a fitness planner layout that fits your life and a tracking system that actually shows you whether you are getting stronger.
Pick up your notebook, open your planner app, or pull up a fresh spreadsheet. Your next training week is waiting to be designed.